


GMS® Partners with Tex-Star Wildlife Services
December 1, 2007
***NEWS RELEASE***
GMS® Partners with Tex-Star Wildlife Services
WACO, Texas — Designers of the No. 1 Tool in Game Management — GMS® is proud to announce it has partnered with Tex-Star Wildlife Services to offer full-service wildlife consultant services to its customers. As part of the all-new service, Tex-Star will provide hands-on guidance and instruction for large and small hunting operations as well as breeder operations to optimize the wildlife and habitat potential of customers’ properties.
“Our GMS technology is a tremendous tool in successful game management, but we want to also make sure our customers have the benefit of experience and knowledge which can help them achieve the best results for their wildlife program,” says Mike Owens, co-owner of GMS. “A lot of property owners or ranch managers have an idea of what they want, but they need guidance on how to get from Point A to Point B. Tex-Star can give them the guidance they need.”
Through GMS, the Tex-Star wildlife consultant services include: micro- and macro-game management, livestock and habitat management, watering facilities, supplemental feeding, record keeping, budgets, census-keeping, predator control, food plot management, fence layout and construction, harvest recommendations, brush management, land acquisition and many more.
“Some ranch owners’ goals may be easy to achieve, while others may be unrealistic given the habitat or other factors,” says Joe Guidry, co-owner of Tex-Star Wildlife Services and a wildlife management professional with 15 years of experience. “Either way, we work closely with each landowner to ensure that all their wants and needs are addressed whether it be macro-managing for general wildlife populations or micro- managing for specific goals such as trophy whitetails.”
GMS is no stranger to wildlife management. The GMS software has been endorsed by some of the largest game ranches in the country, and is considered by most industry experts to be the most complete, yet ‘easy to use’ game management software on the market today. GMS helps hunting operations and land owners manage properties, whose focus is on quality deer and game management (including deer farmers/breeders), organize and maintain all of the pertinent information needed to manage a successful ranch. Innovative and comprehensive, the GMS program allows users to begin quality deer management, track all aspects of a hunting property, develop plans to help maximize herd health, quantify herd ratios, compositions and age structures, develop a wildlife management plan, schedule hunts, record information in the field via Pocket PC technology and much more.
“Efficiency in game management is the key to success,” adds Owens, “and — whether it’s with our GMS software or through 20-plus years of wildlife management experience — we want to help ranch owners reach their goals efficiently and cost-effectively.”
To learn more about the GMS game management software, call 254.752.1608, email [email protected] or visit www.wildlifemanagementsoftware
Located in Waco, Texas, GMS® offers technology for successful game management and is the No. 1 Game Management Solution in the Deer Industry. For more information on GMS, call 254.752.1608 or visit www.wildlifemanagementsoftware
Media Contact:
John Meng
Meng & Associates Inc.
“Marketing That’s Custom Fit”
P. 512.930.7100 F. 512.864.0033
mengassociates.com
DFG Announces Changes to the 2007 Recreational Fishing Regulations
December 1, 2007
Contact:
John Budrick, Associate Marine Biologist, (650) 413-1501
The sport fishery for rockfish, lingcod, cabezon, and greenlings will close from Pigeon Point to the Oregon Border (North and North-Central Management Areas) on Oct. 1. Shore-based anglers and divers are not affected by this action, announced the California Department of Fish and Game (DFG). The closure will remain in effect through the end of the calendar year. DFG approved these conforming fisheries management measures following the adoption of similar regulations for federal waters by the Pacific Fishery Management Council at their meeting on Sept. 13, 2007. Seasons and other recreational fishing regulations will remain in effect for these species in areas south of Pigeon Point (See 2007 California Ocean Sport Fishing regulations booklet, Sections 27.35-27.50).
Recreational catch estimates through July, and projected catches for the remainder of the year, indicate that harvest guidelines will be exceeded for canary and yelloweye rockfish (“overfished” species) if these measures are not taken. Factors that led to the increase in projected catches include redistribution of recreational fishing effort to the northern areas where canary and yelloweye rockfishes are more common, poor salmon catches resulting in salmon fishermen switching to groundfish, and an increase in the daily catch rate per angler for yelloweye and canary rockfish. Exceeding California’s recreational harvest guidelines for these species could jeopardize rebuilding of these species to healthy population levels.
“While we are aware that a shortened season will affect sport anglers, we are also concerned that failure to take action at this time would jeopardize the future rebuilding success for these important “overfished” species,” said Marija Vojkovich, marine region manager.
Under current management measures, the Director of DFG has the authority to take in-season action deemed necessary to prevent catches from exceeding federal harvest limits. As a result, beginning Oct. 1, 2007 the seasons and depth restrictions for boat-based anglers in the Northern and North-Central Management Areas will include:
Northern Management Area (Oregon border south to 40°10′ north latitude near Cape Mendocino in Mendocino County): CLOSED - Fishing for rockfish, cabezon, greenlings and lingcod is closed to boat-based anglers beginning Oct. 1, 2007.
North-Central Management Area (40°10’ north latitude near Cape Mendocino in Mendocino County to 37°11’ north latitude near Pigeon Pt. in San Mateo County): CLOSED - Fishing for rockfish, cabezon, greenlings and lingcod is closed to boat-based anglers beginning Oct. 1, 2007.
Regulations for all Management Areas south of 37 degrees 11’ north latitude: Seasons remain as noted in the 2007 California Ocean Sport Fishing regulations booklet.
For more detailed information about the action taken by the Pacific Fishery Management Council visit www.pcouncil.org.
For more detailed information regarding recreational groundfish regulations and to stay informed of in-season regulation changes, call the Groundfish Hotline (831) 649-2801, or visit the Marine Region Web site at www.dfg.ca.gov/marine.
###
Four Arrested Friday in DFG Delta Poaching Case
December 1, 2007
California Department of Fish & Game
Four Arrested Friday in DFG Delta Poaching Case
Contact:
Capt. Brian Naslund, DFG Enforcement, (916) 838-7426
Harry Morse, DFG Office of Communications, (916) 322-8962
Kyle Orr, DFG Office of Communications, (916) 322-8958
Department of Fish and Game (DFG) wardens today arrested four individuals suspected of illegally harvesting and selling sport-caught fish from the Sacramento-San Joaquin Delta. Sport-caught fish are caught for recreational purposes only and are not to be sold.
“The Department of Fish and Game works diligently to protect the fish populations in the fragile Delta ecosystem,” said DFG Chief Nancy Foley. “Illegal take and sale of this valuable resource jeopardizes conservation efforts by the department and our partners.”
Wardens obtained a search warrant and four felony arrest warrants from the Sacramento County District Attorney’s Office for conspiracy and the sale of sport-caught fish.
Thirteen wardens executed the warrant and two felony arrest warrants at
The investigation began in September when DFG’s Delta Bay Enhanced Enforcement Unit received anonymous tips claiming a group was illegally catching and selling a variety of fish species from the Delta.
Wardens followed up on the information and observed the suspects involved in what appeared to be the illegal commercialization of several sport fish species. The individuals caught the fish under the authority of a sport fishing license and then transported them to locations in Elk Grove and
“This is another example of the Department of Fish and Game’s ongoing effort to protect
Charged and arrested were, Tam Thi Dang, 46, of
###
Lawsuit Filed Against ALS Enterprises, Inc.
December 1, 2007
CLICK HERE FOR FULL 42 PAGE PDF FILE
UNITED STATES DISTRICT COURT
DISTRICT OF MINNESOTA
Theodore Robert Carlson, Mike Buetow, CIVIL ACTION NO.: 07W3970 RHKIJSM
Gary Steven Richardson, Jr., and Joe
Rohrbach individually on behalf of
themselves and all other Minnesota CLASS ACTION COMPLAINT
residents and entities similarly situated,
Plaintiffs,
v.
A.L.S. Enterprises, Inc., Cabela’s Inc., JURY TRIAL DEMANDED
Gander Mountain Co., Bass Pro Shops,
Inc., and Browning Arms Co.,
Defendants.
Plaintiffs Robert Carlson, Mike Buetow, Gary Steven Richardson, Jr., and Joe
Rohrbach individually on behalf of themselves and all other Minnesota residents and entities similarly situated, by and through their attorneys, Merchant & Gould and Hein Mills & Olson, P.L.C., as complainant against defendants A.L.S. Enterprising, Inc., Cabela’s Inc., Gander Mountain Co., Bass Pro Shops, Inc., and Browning Arms Co., (collectively “Defendants”), allege the following:
CLICK HERE FOR FULL 42 PAGE PDF FILE
Field Dressing a Deer
December 1, 2007
By Anonymous
There may have been years worth of work that has gone into bagging your first deer and not always are you fortunate to have someone with you that first time that can teach you how to field-dress a deer. The following directions are the basics of field dressing. Please keep in mind that everyone has his or her own favorite way to do this. Many prefer to completely dress the animal in the woods and others choose to “field” dress and finish the job when they get back home. The option is really yours and where you prefer to be. Personally, I like to do as much as I can in the woods.
Having someone with you to assist makes the job easier but I will assume that you are alone with your prize.
1. Locate a spot in the woods that can be beneficial to you. Most prefer to dress a deer on a bit of a downhill grade, so if that is not an option, look for a slight rise in the nearby terrain and drag the deer there. You can use the grade off one side of the rise.
2. The single most important thing that you want to focus on is not cutting into the “ponch”. The ponch is the stomach and intestines. Rupturing those can be messy and the odor sometimes is overpowering so work slowly and methodically.
3. If you can position the deer on its back that would be helpful. Again, if you are alone use your dragging rope to assist in tying the deer into position. Don’t be bashful. I find that if I straddle the deer’s head and hold its front legs apart with my knees, it affords me room and keeps both hands free to cut. If you have rope, use it to hold the deer’s two front legs apart.
4. You will find that the dead weight of the animal can be difficult to handle so be patient. The lower part of the deer will be rolled to one side or the other. Starting at the chest area and working toward the butt of the deer is easiest and at a point you need to move from your straddle position at the head to the rear.
5. Start at the chest. Find the point where the rib cage joins together and with one hand grab the hair and skin and lift it up and away from the stomach cavity. With the other hand, use your knife, and you better hope it is sharp, and begin cutting the hide being careful not to go too deep. As you cut, you will find that there is the layer of the hide and directly under that is a thin muscle area that protects the stomach and intestines. Go ahead and carefully cut that as well.
6. Move from the point of the rib cage toward the rear. Approximately 2/3 to ¾ of the way down the torso you will need to switch ends and move down and hold the hind legs apart as you finish opening the deer. The farther you get away from the rib cage, the easier it is to hold the hide and inner muscle layer up and away from the ponch.
7. If the deer you have shot is a buck, you will soon come to its testicles. Choose one side or the other to cut around but eventually you will remove those from the deer. Continue cutting and slice the hide all the way to the anus.
8. This is where most hunters have differing opinions as to what to do next. Most are correct – just different approaches. Hopefully you have succeeded in keeping the stomach in one piece. There are two more things that you need to keep tabs on and work hard not to rupture if possible as some contamination could occur. One is the bladder, the other is the intestines. Many times both will have matter contained in them. Assume that they do.
9. Roll the deer onto one side with the opening you have just made in the body cavity facing downhill. This will require loosening or retying your ropes if you are using them. Let the guts roll out onto the ground along with the blood that has collected in the body cavity. You will now need to get down and get dirty. Reach up into the chest cavity until you find the esophagus. That is the “pipe-like” tube coming from the throat to the deer’s stomach. Once you have found it, reach in with the other hand and a knife and cut it off. This will release the majority of the guts and the intestines will still be connected to the rectum.
10. While holding the hind legs of the deer apart, take your knife and finish removing the testicles. Once that is done, continue cutting with your knife into the meaty part between the hind legs until you strike bone.
11. Move to the very rear end of the deer and locate the anus. Like a fine surgeon, carefully cut around the anus. If you follow the anus through the cavity located between the deer’s hind legs, you would discover that the intestines connect to the anus. If you are careful you can continue to cut around the anus moving deeper and deeper at the same time lightly tugging at the intestines still connected to the guts you have rolled onto the ground. Once successful, you will be able to remove the anus in one piece still connected to the intestines. Some hunters will cut the intestines to finish removing the guts before they remove the rectum and anus. If you choose this option, be as careful as you can not to get deer feces inside the deer cavity. If you have shot a doe, remove the female organs with the rectum and anus.
12. Next, the bladder should be removed. When you removed the testicles of the buck or female organs of a doe, you cut the tube that carries the urine from the bladder. At the end of the bladder toward the head of the deer, is another tube that enters the bladder. Cut it off being as careful as you can not to rupture or spill urine into the cavity. With both tubes cut try to remove the bladder by holding both tubes to prevent urine from escaping.
13. All that is left is the diaphragm and the lungs that you will find deep up inside the chest cavity. You will need reach up inside and cut through the diaphragm to gain access to the lungs. The furthest reach you will have is to locate the windpipe and cut it off. Once that is done the lungs and diaphragm come out quite easily.
That is pretty much it. Again some hunters prefer to only remove the ponch and finish the job later. That’s up to you. If you have access to water, it is helpful to be able to rinse off yourself and some opt to rinse the inside of the deer cavity as well. Some will do it well when they get home.
A couple more helpful hints: Carry some extra paper towel sheets with you or I carry baby wipes. They can clean up a lot of things and I often use them as toilet paper. Also, once the deer has been gutted, I like to roll the deer into a spread eagle position and leave it while I clean up etc. and let a lot of the blood in the cavity drain before it clots.
Tree Stand Tips
December 1, 2007
By Robert Lane
 Bob Lane is a Licensed Master Maine Guide and photographer. He has also guided Caribou Hunters and Fishermen on float trips in Southwest Alaska.
July’s warm, sunny weather doesn’t provide much incentive to think about deer hunting to outdoorsmen who are trolling for deep swimming salmon and togue, whipping out the fly line during the drake hatch, or pursuing numerous other activities in the Maine woods this time of year.
This time of year I find myself occupied with trying to decide where I’m going to fish during the week and on the weekends, and trying to fit the kayaking and photography in to boot. Being an avid outdoorsman is no easy task. With the expanded archery season opening in September, rifle season for the elusive whitetail opening in November, now is the time to begin preparation to increase your odds for a successful hunting season. Rifles need to be sighted in, bows and arrows need to be tuned, and shooting practice begun in earnest, and, if you hunt from a climbing tree stand, it needs to be inspected and readied for the upcoming days afield.
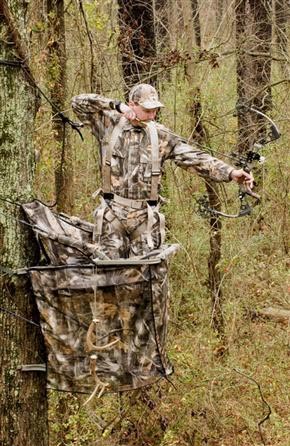
Over the last 10 seasons, I’ve shot nine deer from my portable climber and I swear by the method. I’d no more go out without it than I would without my favorite rifle. However, I find that the tree stand is the most overlooked piece of equipment in the hunter’s arsenal. Its usually hung in the garage, or tucked away in the cellar and forgotten about until a few days before the season opens. That’s no time to discover a problem that may require a repair or replacement part. Now is the time get it ready for archery and rifle season.
First and foremost is to go over the stand and check the welds. Make sure that they are still solid. I had a crack in one on a stand a few years ago. Luckily I caught it before I went out. It was a simple matter to get it repaired.
If your stand attaches to the tree by cables, check these carefully for fraying and general wear. Any doubt about their integrity is reason enough to replace both of them. If one is bad, most likely the other one will be too. Most manufacturers sell these and a variety of replacement parts for their climbing and stationary stands.
If yours is an older climber and made of steel, attach it to a tree and get in it. Stand up, sit down, twist, and turn and listen for any creaking noises, squeaks etc. Nothing will alert a deer to your presence more than a noisy stand. I lost a shot at a nice buck years back because of it. This is critical if you are a bow hunter and are shooting at close range. The deer that busted me was almost 40 yards away when my stand creaked.
 Noise isn’t such a problem with the new aluminum models. I have one of these, but I still get in it just to be sure. I have found that birch trees combined with a climbing stand will make noise even after the stand has been secured in place. Most noise can be cured by tightening a loose part and making sure that it is snug against the tree when reach the desired height.
On steel stands rust can be a factor. It gives off odor that an animal can detect. Ask any fox or coyote trapper about rust. They dye and wax their traps to keep them from oxidizing and emitting a smell. Just because you’re 15 feet off the ground doesn’t mean scent from you and your equipment will go undetected by a deer. A number of variables such as temperature, wind, air density will affect how scent is carried to the nose of a wary whitetail. Any rust should be removed with a wire brush and the area repainted to prevent further rusting during the season when the stand is exposed to the elements. Doing so will also increase the life of the stand.
Once I’m up in my stand I stay all day, and that requires that I be comfortable. Cushions will wear out and the covering will deteriorate over time making them uncomfortable, or unusable. Sitting over a prime trail or feeding area is no place to be moving around in a tree stand trying to get comfortable. Check those seats early in the season and if they aren’t up to the job, repair or replace them. Again most manufacturers carry these and other replacement parts.
I always go over my safety harness at the end of each season and again in the summer, and check for fraying and other wear. Most harnesses have a special tacking on the tether strap that connects from the back of the harness to the tree, and is designed to lessen the shock of a fall. Most of these are designed to be used only once. Check yours to be sure this tacking is still intact. If it isn’t, consult the manufacturer before you use it.
I keep two four point harnesses in my truck at all times in case one becomes unserviceable. If you forget yours, either go back home and get it, or hunt from the ground. The records of injuries incurred as a result of falls from trees stands are grim. Many a hunter has been crippled for life and others have been killed from falls from as low as ten feet up.
Under no circumstances should you use anything but a four point harness when hunting from a tree stand. The old type that consisted of a belt around the waste could cause a hunter to hang doubled at the waist, or inflict serious internal injuries. Last year I saw a guy in a stand with a hank of tow rope under his shoulders attached to the tree by two half-hitches with about two feet of slack in the tether rope. It was a recipe for disaster if I ever saw one.
My harness is on and attached to the tree as soon as I’m in the stand, and before I start climbing, as the majority of falls occur when ascending and descending the tree. Once I’m up in position I take all of the slack out of the tether. This pretty much eliminates any shock when the harness fetches up should I fall. The shock of a two hundred pound body falling a foot or even six inches and then being suddenly fetched up is painful at best and could result in injury. No slack in my tether also allows me to use it as a stabilizer and lean out over the stand when bow hunting.
Always carry a cell phone and let someone know where you are and when you expect to be out of the woods when hunting from a tree stand. I have several emergency numbers pre-programmed into mine. My phone has a lanyard on it that is looped through the buttonhole in the flap of my shirt pocket, eliminating the possibility of dropping it. If you should have a mishap and are unable to climb back down the tree, the phone could mean the difference between a long stint and possibly an overnight hanging in your harness. Your chances of hanging up-right and being able to call someone on the cell phone are better if you are strapped into nothing less than a four-point safety harness. Over the last couple of years I’ve seen several devices on the market that are designed to assist hunters in getting back to the ground after they have fallen and are hanging in a safety harness. These can be found with a little searching on the web. Summit is a major manufacturer of tree stands, harnesses, and accessories. I’ve had good luck with their products. Check them out at www.summitstands.com
Tree stand inspections and proper safety procedures don’t take a lot of time or effort, or even cost much for that matter. They can save a day’s hunt or even a life. While not all falls are fatal, many, hunters have seen an abrupt end to their hunting days due to crippling injuries resulting from a fall from a tree stand that hasn’t been properly maintained, or used in conjunction with a safe, four-point harness.
When opening day rolls around, I want to be up in my favorite tree at daybreak, watching the shadows give way to the day, and listening to the sounds of the woods waking up. I’ll watch the edge growth, the hardwoods, and the thickets, confidently focusing on the hunt, knowing that my stand is secure and my harness safe, because I took the time to go over my gear well before the onset of the best season of the year.
Doing “Dogs” With Dr. D
December 1, 2007
By Denny L. Vasquez
The weather was almost perfect, if such a thing is possible. The low of the previous night had been in the high 40′s while the highs predicted for during the day were only in the upper 60′s. Overcast, cloudy skies were the only negative aspect of the weather conditions that we would have to contend with. The lackluster sunlight that the thick cloud cover would allow to filter down wouldn’t allow the “dogs” to stand out in as sharp a contrast as they would have on a clear and sunny day. But, even though we wouldn’t be able to see the dogs “shine” in the sunlight, as they lay on top of their mounds, we knew that it would be a good day for a prairie dog shoot.
The date was September 30,1994 and this was the first day of the Burris Company’s annual prairie dog and pronghorn antelope hunt. My hunting companions for the prairie dog portion of the hunt were Pete Fossleman, a former Associate Editor of Gun World Magazine, and Dwight Van Brunt, Dr. D, the former Director of Marketing and Sales at Burris. Read more
Getting Invited Back
December 1, 2007
By Denny L. Vasquez
How many times have you been invited to hunt someone else’s property, such as a family farm or private lease? Or how many times have you been invited along on a nice hunting trip, say to Colorado for elk, Maine for black bear or Texas for whitetails? Now, how many times have you been invited back?
In today’s increasingly urbanized world, good hunting spots are getting harder to come by. For example, that little creek bottom where I grew up hunting squirrels is now a county park and the only recreation going on there now is the kid’s soccer and baseball games. And the old 350-acre Millsap place where I learned how to hunt deer, raccoon and rabbits is now a victim of the growing urban sprawl that is engulfing the countryside. Read more
After The Shot
December 1, 2007
By Jerry Allen
Blood In Motion: A Forensic Guide to Blood Tracking
It takes a lot of work to set up and execute a hunt, but what happens after the shot will determine if the hunt is truly a success.
You’ve scouted and set up stands. You’ve sighted in your guns and bows; maybe planted a food plot and hauled bait into the woods. It’s hard work, to say the least, and finally the animal comes in and the shot is made. How long will the trailing process take you? Will you find the animal? Understanding how to track and find blood can make the difference between having meat and a trophy to show for all the hard work that you have put in — or coming home with nothing at all. You make a plan when you hunt to increase your chance of success, but if you track without a plan, your chances of success are greatly reduced.
I sell blood-detection products to law enforcement, and my business has giving me a lot of information on what to look for and what a blood trail can tell you about the hit you’ve made on an animal. I am called to many deer trails after all hope seems to be lost, because many people know that I can find blood that cannot be easily seen. Blood trails can be misleading to the hunter —lots of blood does not necessarily indicate a mortal wound, nor does a seeming lack of blood necessarily mean the animal isn’t dead.
The reaction of the animal and the blood pattern will give us a better understanding of how to go about recovering an animal. Normally, animals do not bleed to death, as an animal that weighs 160 pounds must lose 45+ ounces to die from blood loss alone. Animals will die faster from trauma than blood loss, and a combination of both is by far the best.
Most animals can travel very fast when wounded — deer can hit 35 mph, and even if they die quickly after the shot, they can travel a long distance before collapsing. A wounded animal will not go far unless it is pushed or sees movement. Sit still for at least a half hour, or you will make the tracking more difficult. Now that many states offer multiple tags, this will also give you a chance to get another animal — if you shot a large buck, it is still possible that there is a larger one close behind him. Most animals travel in loose groups; the animals in the rear of the group can help by showing you where the wounded animal traveled. Spooking these animals will remove helpful clues to the whereabouts of your trophy, and may cause a second opportunity to be wasted.
Pay attention to the reaction of the animal when it is shot, as this is your first clue to helping you know how to find it. The reaction can be deceiving, but it is still important. I have shot deer and had them look at me like nothing happened, only to watch them fall over where they stand. I have had many hunters tell me that they knocked the animal down, only to watch it suddenly jump up and run off, leaving lots of blood.
This is the one that I hate to hear the most. First of all, body shots that do not impact the neck or spine rarely make animal drop, and if the neck or spine is hit, the animal is usually disabled and cannot get up. The clues of the “dropped and got up and left lots of blood” tell me it was most likely a leg or low shoulder hit. The falling down likely means the leg was broken; lots of blood usually indicates a muscle hit. Muscle damage leave lots of blood in the first 100 yards, but then the blood trail fades fast. There will be lots of large spots of blood as the animal stands often and will lean against trees. Even with a broken leg (or two), an animal can run very fast.
I have had a lot of people tell me, “I thought I hit it, but there was no blood.” Any time there is a wounded animal, there is blood, even if it cannot be seen. Blood droplets, which are forced out of the body by gunfire, produce a high-velocity-impact splatter pattern. The pattern can be smaller than 1 mm in the beginning of the trail. Shots taken with a bow leave medium-impact blood splatter patterns and will leave droplets around 3 mm in size. Both can be difficult to see, even in the snow, so trust your instinct and follow the trail the deer took. If the deer was hit, the blood will appear soon. If it was a lung hit, it can take time for the body cavity to fill and blood to be forced out. Animals may run in the beginning of the trail; this will cause blood trails to be harder to see, as the blood is spread over a larger distance. If there is no visible blood trail, wait and let the animal lay down — it will not go far and should die quickly.
Another common animal reaction is the hind leg kick. This reaction indicates that the animal was hit farther back, most likely a gut shot. The blood pattern and the color of the blood will be very important. Darker blood is from the stomach or liver. A liver shot is always fatal, but is still a poor shot to take. Green matter or food is from one of the deer’s four stomachs — a fatal shot, but it will most likely take until the next day or later for the deer to die from a stomach shot. Give this animal at least three hours and follow up in the daytime.
The double lung shot is the best-percentage shot to take, as it will cause massive internal bleeding and drowning, causing death within about 150 yards. This pattern will start out with little blood, but it will increase as the animal starts blowing blood out the mouth and nose.
Quartering-away shots always cause the most damage, as the projectile will travel more distance through the body. Shots from a raised area (tree stand) generally give a better blood trail, as the exit hole will be lower and allow blood to leave the body cavity in greater volume.
Shooting for the tail is the worst shot, leaving only a wounded animal or spoiled meat. If the shot hits the back of the thigh, it will bleed well but will not die soon, as the muscle will tighten up and help stop the bleeding. An animal shot in the anus will spread bacteria all over the insides, and the damage will be even worse if the bladder is also hit. This type of shot requires the animal to be cleaned immediately and thoroughly washed out in order to save any of the meat.
So I Have A Wounded Animal, Now What?
Blood trailers spend a lot of time looking on the ground, but little time looking at the brush, where more than half the blood is usually found. Blood on brush can reveal how high or low the shot hit, helping in the recovery plans.
No hunter should be without a compass — use it to get a bearing on the trail taken using a marker like a unique tree to track to. Working in pairs is best; have one tracker circle ahead 75 to 100 yards in case the animal is alive. Then have the second person take the trail. Repeat this until the animal is recovered. Remember to be safe when tracking, because all animals are dangerous when wounded. Proper gun handling and line-of-fire rules must be followed to avoid injury.
Timing is very important. Tracking too soon is the main reason mortally wounded animals travel a long distance and make recovery difficult or impossible. Tracking too slowly will cause the meat to spoil. Reading the clues properly will make the difference in how good the meat tastes, since recovery shortly after death is important. Meat with a gamey taste can be caused by slow recovery, not cleaning properly or hanging in warm weather.
Adrenaline runs high after the shot, and humans have a hard time controlling it. Relax, breathe deeply and take a few moments to reflect about what happened. The beginning of the trail is the most important place to get the facts of what happened and how to proceed.
The first thing we do at a crime scene is cordon off the area to keep people from altering evidence. Then we use only a few people to process the scene, again, to keep from altering or destroying the evidence. Walking on a blood trail will transfer the blood pattern from its original spot to somewhere else, or destroy it completely. Never put more than three people on a trail unless it is hopeless to recover without extra people. Mark the trail as you progress to give you a travel pattern to study for clues.
Unless the animal drops within sight, no trail should be taken within 30 minutes. The animal you just shot will be looking at the spot where it was wounded to see what happened. It will lay down soon and try to lick or heal the wound, usually with in 40 yards if there is cover. Do you want to turn a 40-yard trail into a 400-yard trail?
Many times I am asked to follow a blood trail that had a small amount of blood that suddenly had twice as much blood, then nothing. This usually means the animal has turned 180 degrees and walked over the same trail twice, then cut off at a 45- or 90-degree angle after it decided the trail it was following was not safe.
The blood left on the ground or brush is important, as it can tell much about the wound. Bright red or pink indicates an artery or lung shot. Many animal trails I have followed were from shots that hit low in the shoulder or leg, leaving large amounts of blood. The blood is slightly darker with a very narrow trail 4 to 8 inches in width. This animal will likely need a second shot. Make plans to get a person ahead to dispatch the animal. Trails of blood more than 2 feet wide are complete pass-through shots and increase the chances of recovery greatly. Blood trails that have squirts of blood on the side of the trail 2 feet or more indicate arterial shots in the neck, heart or other major artery. Give the animal time to bleed out before you start tracking. Brown or greenish blood, or blood with green or brown matter, is always a gut or liver shot — in both cases, the animal will need extra time to die before you attempt to recover it. The liver shot will kill faster, but may still take two hours or more. Blood with green matter is a five- or six-hour wait to track. The tracker should attempt to put a shooter ahead to dispatch the animal if it is still alive.
Many visual blood trails disappear when the animal’s heart stops and the blood pressure drops, as the blood is no longer being forced out of the body. Most animals can still travel 30 to 45 seconds and cover 65 yards or more before dropping, and the blood trail will be almost impossible to see without blood-tracking aids. Bluestar® will come in handy, as the animal will be close by but may not be seen because of terrain or brush.
Many times I have found animals within 40 to 50 yards of the stand, where they died after having run 250 to 300 yards in a long arching circle, trying to get back to the spot they were safe in before the shot. Knowing the bedding areas helps a lot if you cannot find an animal.
There are tools we can use in tracking. Dogs are now legal in many states, and are a great tool if there is no rain or snow. However, most people do not have dogs or have the time to train them, nor do they have the money to pay a dog tracker. Dog tracker fees vary but usually end up around $150. Lights made for finding blood do not work very well, as blood absorbs light. Regardless of what you see on TV, law enforcement officials do not use lights to find blood. There are a few luminol-based products (Tink’s® and Bluestar®, notably) that make blood glow in the dark. I prefer Bluestar® because it was first made for forensic use.
Bluestar®’s inventor, Dr. Loïc J. BLUM, with a Ph.D. in chemiluminescence, has perfected the mixture, making it the easiest and strongest blood finder in the world. It is used in more than 70 countries by law enforcement and hunters alike.
Bluestar® picks up hemoglobin, which transports oxygen to the cells. Hemoglobin contains iron, which is a basic element of earth and is nearly impossible to destroy without fire.
Much time was spent to produce a product that the investigator would need little or no training to use and that could tell the difference between blood and other items containing iron.
Sold in tablets that you add to water, this is the best tracking agent on the market today. At a cost of $19.95 to track four animals, the cost is very affordable. You can usually cover 100 yards in 10 minutes or less, and the time saved will be worth the money spent.
Small and lightweight and sold in packs of four, Bluestar® gives the hunter enough to cover even the longest trails. Bluestar® also will work well in evergreens and moss, because the reaction with blood is so much different from “false positives” that any one can tell the difference. Bluestar® was made for law enforcement to find blood amounts so small the DNA profile cannot be done. Even in the crime scene, clothing or items that have been cleaned over and over will still glow bright blue were blood was present.
Many times the hunter cannot find the beginning of the trail. Before you leave the stand, use a waypoint to know where the animal was standing when the shot was taken. A compass is perfect for this, using a marker such as a tree to find the spot.
Many times I use Bluestar® only to find the start of the blood trail. To do this, spray while walking across the trail as soon as you find the blood. See if you can follow it with your eyes; if not, continue to use the Bluestar®. I often use it to regain a trail when an animal changes terrain, going from leaf litter to grass fields, for example. Bluestar® will work in the rain or snow.
You will learn a lot about trailing when using Bluestar®, since you will see the whole trail every time you use it and can key in on the evidence the blood trail leaves.
Since it glows bright blue in the dark, even people who are colorblind or whose eyes are “not as good as they used to be” can follow the trail without any help. No glasses or lights are needed, just water and a spray bottle. Water can be taken from streams, lakes and ponds along with any tap or bottled water. In extreme cold, you can use window washer solvent.
Another advantage of Bluestar® is total darkness is not needed, just low light after shooting hours end.
Mix a set of tablets in a sprayer and spray on the ground where the animal was standing, and if the animal was hit, there will be a bright blue glow. Blood is easily transferred from one place to another, so stay off the trail or you will leave footprints of blood all over the woods. There will be an unbroken trail of blood where the animal went when using Bluestar®. If you just find blood spots here and there, these are transfer patterns made by people and animals walking on the blood trail. Blood will be trackable for a very long time. There has been a forensic study on Civil War sniper holes at the Shriver House museum in Gettysburg, Pa., and blood was found more 143 years after it was shed. Blood will last in the woods for months, but there is a big difference in the brightness between old trails and new ones. Blood on the hands of a hunter after gutting an animal without gloves will remain for weeks, no matter how well the hunter washes. This is used frequently in murder cases.
Last but not least, use trail markers. This will help if you need to leave the trail for any reason and will help anyone who is trying to join later on to find the trackers. This also gives a pattern of travel, which most likely will be an arch traveling back to the bedding area downwind of the stand. Bedding areas are thick with a good view and take advantage of wind direction, and they provide a perfect area for a wounded animal to try and recover.
So no matter what happens before or after the shot, there are tools that cost very little and will save lots of time, and help us remain ethically responsible by recovering game quickly and efficiently. For more info on Bluestar® go to http://bloodglow.com/. You can call Jerry anytime on his cell phone if you need help figuring out a trail. (888) 579-1965, toll free.
The American Badger
December 1, 2007
Learn about the interesting habits of the American Badger from the experiences and vast knowledge of Denny L. Vasquez.
Badger Range
Scientific Classification: Read more

 After a little internet searching, reading, and checking up on this stuff I found it�s a pretty well established product in Canada and hails from Quebec where they have this funny habit of speaking a lot of French. Thus the name, Jig-A-Loo, and the company�s claim it derives from a saying they have up north, �I�ve got it!�

